
Quick Start - Tunnels
How to start using Webhook Relay to open tunnels
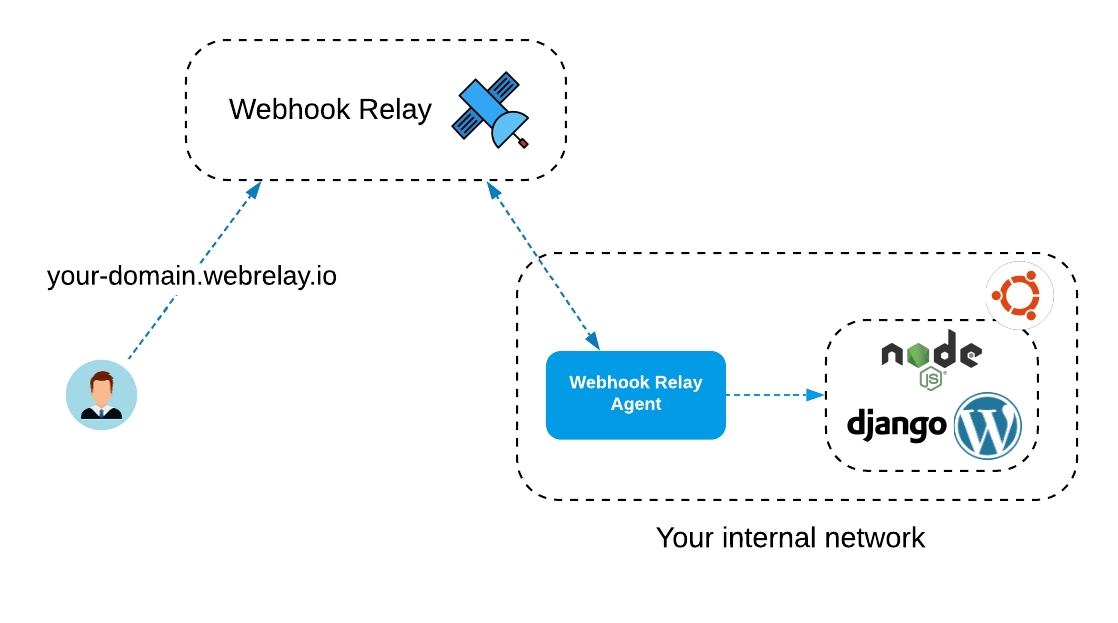
Tunnels enable bidirectional connections to services running on your computer or in a private network.
Popular use-cases:
Accessing web servers during development, to share your work.
Remote access to your IoT device (a POS kiosk, Home Assistant controller, etc.).
Access to an internal cloud service to avoid allocating IP and domain.
Access to servers that are behind CGNAT.
Prerequisites
Webhook Relay account, if you don’t have one, create one here: https://my.webhookrelay.com/register.
Client application ‘relay’, installation instructions here.
Opening a tunnel
To specify a tunnel name when using connect command:
relay connect --name www http://localhost:4000/Example output:
relay connect --name www http://localhost:4000/
Connecting:
http://demo-1.webrelay.io <----> http://localhost:4000/
This command will configure a tunnel and keep the connection as long as your terminal is running. You can view your tunnels here: https://my.webhookrelay.com/tunnels.
Password protection
Anyone who can guess your tunnel URL can access your local or private web service unless you protect it.
To enable HTTP Basic Auth provide --username and --password flags:
relay connect \
  --username foo \
  --password bar \
  http://localhost:4000
Accessing a URL now will prompt users for credentials.
Token protection
Similarly to HTTP Basic Auth you can also specify token protection. Tokens are easier to pass around:
relay connect --subdomain landing --token <token>Even though basic auth and token protection can prevent unwanted visitors to your websites, it is advisable to also enable SSL.
HTTPS
Encrypt communication to and from your website using HTTPS. It is important to encrypt as much web traffic as possible to prevent data theft and other tampering. This is a critical step toward building a safer, better Internet.
Traffic between an agent and the public service is always encrypted and encryption cannot be disabled.
There are several crypto options for tunnels:
Off is an option that disables encryption.
Flexible is a most common option for secure websites, testing and demo environments. It allows both HTTP and HTTPS traffic.
Full is an option that enforces HTTPS by redirecting all traffic from HTTP to HTTPS.
To create a tunnel with flexible encryption use --crypto flexible flag:
$ relay connect --crypto flexible http://localhost:4000/
Connecting:
http://xyz.webrelay.io <----> http://localhost:4000/
https://xyz.webrelay.io <----> http://localhost:4000/
HTTPS is available for all paid plans on all tunnels.
Custom domains
You can have your tunnel on non webrelay.io domain. To do this, when creating a tunnel, specify hostname (you can also create it through the web UI):
relay connect --host local.example.com http://localhost:4000/Now, if you go to tunnels page, you should see a CNAME specified next to your tunnel name such as 872e472d.cname.webrelay.io. Next, using your DNS provider add a CNAME record for local.example.com and point it to 872e472d.cname.webrelay.io.
Keep in mind that since we don’t have certificates for your domain, they won’t match (our certificate is for
*.webrelay.io). If you have a TLS key and certificate, use TLS tunnel.
Region selection
Webhook Relay regions:
default region is in Belgium (country can change without notice)
au - Sydney, Australia
us-west - Silicon Valley, US
When using ‘relay’ CLI
When using relay CLI, specify --region <region name> flag:
relay connect -s whr-demo --region us-west :4000
Connecting:
http://whr-demo.us-west.webrelay.io <----> http://127.0.0.1:4000
When using Docker container
When using webhookrelayd there are two options to specify region:
First one is to set environment variable
REGION=us-west:
docker run \
  -e REGION=us-west -e KEY=<key> -e SECRET=<secret> \
  webhookrelay/webhookrelayd:latest \
  --mode tunnel -t tunnelName
Second option is to set it via the command flag:
docker run \
  -e KEY=<key> -e SECRET=<secret> \
  webhookrelay/webhookrelayd:latest \
  --mode tunnel -t tunnelName \
  --region us-west
Tunnels with Docker
When used with Docker, webhookrelayd container needs a way to communicate with other containers. For this, we can use “links”. Here’s an example how to connect to a running container called jupyter:
docker run --link jupyter:jupyter \
  -e KEY=TokenKey -e SECRET=TokenSecret \
  webhookrelay/webhookrelayd:latest \
  --mode tunnel -t jupyter
Tunnels for Kubernetes
Do you want to use tunnels inside Kubernetes? See ingress section for installing and configuring Kubernetes ingress controller.
Last updated
Was this helpful?